
Today we will be creating a SVG File – using glyphs special characters and weld feature in Inkscape. We are using Inkscape today.
Inkscape is a Free graphics program that you can download on your desktop computer to create vector images mainly SVG PNG format along with other formats. Click on this Link to download Inkscape https://inkscape.org/

I have used the font Meysha which is free to use for personal use. you can purchase this font for commercial use from following link
Purchase Meysha Font for commercial use at https://www.creativefabrica.com/product/meysha/ref/410979/
There are plenty of free fonts available for personal use that you can download and install in your computer from online websites like
We will also be using Character Map which comes in your computer in Windows Start Menu >Windows Accessories >Character Map. The version that comes with your computer is small and hard to use. There is a another Free Version available to download from Windows which is better when using with Graphic Design. I am using this downloaded version in my Tutorials
Download Windows Character Map UWP to show special characters and glyphs available in a font Https://www.microsoft.com/en-au/p/character-map-uwp/9wzdncrdxf41?activetab=pivot%3Aoverviewtab


Watch a Video Tutorial on You Tube
Fonts come with special characters which you can use easily to create Stunning Texts. A Step by Step Tutorial will guide you through this easy Technique. This Technique can be used in any Graphic Design Software. We are using Inkscpae today. But the same principles can be applied in Cricut Design Space and Brother Scan and Cut Canvas Workspace
Lets Start the Tutorial
This is your workspace in Inkscape.

With your pick tool (arrow on top left hand menu) select the font button which is the letter A in your left hand side menu bar. Click on the workspace and type your text Twenty one. double click to highlight the text. The font menu shows up on top left corner. click on down arrow next to font name which shows the default font.


You can download free fonts for personal use from the internet like dafont.com or 1001freefonts.com. See Links Above. Most fonts are free to use for Personal Use. Please read license Agreements before using any fonts for Commercial use
Click on the arrow in font selection box. Scroll down to find the font you want and click on the font name. the highlighted text font will change to Selected Font. I have used the font Meysha which is free to use for personal use. you can purchase this font for commercial use from link above
Make the word bigger by dragging the handles so you can see better. As you can see the letter T is separated from the rest of the letters.
For a cake topper you need to join all letters that is weld it so the each letter is attached to each other. if you are cutting adhesive vinyl or htv heat transfer vinyl you can leave the letter T separate.
At any time we if we are unhappy with the changes we can click on the undo button on the top menu bar. or press redo button if you like changes.
For today’s tutorial we will be altering the text using special characters of the font Meysha. Open character map, you can type the font family name or click on the alphabet to browse all fonts starting with that alphabet. Click on the letter A. From the menu that opens select letter M as we know the font name starting letter. the box below shows all fonts starting with M. Scroll to find Meysha and click on it.
On your right hand side the window shows all characters relating to this font. As you scroll down find the glyph that you want to use and click on it. When you click on the glyph, it shows a larger version in the far right window. Click COPY Button in the right section, which will copy to your clipboard.
Open the Inkscape window. Highlight the letter you want to change. TIP: The font in your Inkscape should be the same Font that you are using in Character Map. Otherwise it will not work. Right click. Paste. You can see the text changes to the special character.


In Inkspace, you cannot see the glyphs properly as the height of the word is too high. We will fix this in the next step.
First you need to change all letters with the special characters that you want. Once we do the next step you will not be able to edit the text. When you have changed all letters as desired, click on it to highlight the word.
In order to make the text into a SVG we need to change the text to an OBJECT. On top menu bar click on Path menu>Object to path
Now you can see the glyphs on your text. Once you do this, your text is no longer a font but becomes an object


Click on the x in the Colour Palette to remove colour. Right click on the black colour. From menu select Set stroke colour so we can see the outline of the text. You can see even though the letters looked joined, it is not. If we send to cut/draw right now, your machine will cut each individual letter out. Lets fix this. Click to highlight the text. Now click on ungroup shortcut on top menu bar. Or click on Object menu>Ungroup.
At this Point you can move each letter. We will move the Letter “T” so it is attached to the other letters. You can move the other letters around so they move closer or if you want to create special effects.
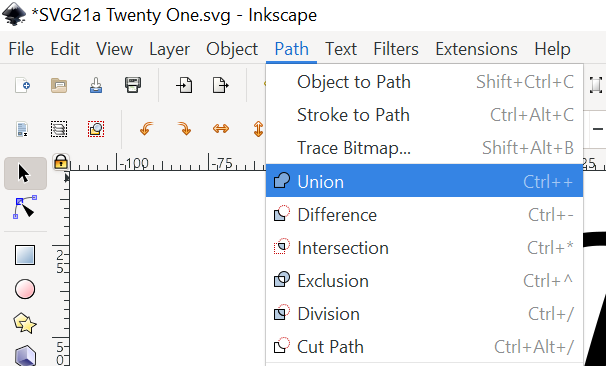
Highlight the whole word. Then Click on Path>Union. This will weld the letters together. Your SVG is now ready to be Saved. In my Sample photo I created an Offset for the text (see Offset Blog Post / YouTube Video) and layered it

Click on File>Save As
Select the folder where you would like to save your SVG. Type the Filename. In Save as box select “Plain SVG”. Click on Save.
Now you can Import your SVG in to eg Cricut Designspace and cut / draw any material
Follow my YouTube channel for more Tutorials in Inkscape, Cricut DesginSpace, Brother Scan N Cut, Canva Graphic Design, Corel Draw and more
Https://www.youtube.com/c/Zyneri


